How to assemble a planter and plant flowers?
If you value your plants and want them to always be healthy, then choose LECHUZA pots with a self-watering system. This is a unique solution that will allow the roots of your flowers to receive the required amount of moisture even without your intervention. Fill the reservoir and forget about watering, the root system will take moisture when it needs it. Such exclusive pots have many advantages, try it and see for yourself. You can choose large self-watering floor planters or small tabletop ones; an automatic watering system will greatly help you in caring for any plants.
How to assemble such a pot correctly?
To place a plant in a self-watering pot you need to collect it. It’s easy and will take a few minutes. Follow these simple instructions to do everything right.
- First, you need to correctly install the water indicator, which will show the liquid level in the tank.
- Now you should carefully fasten the water inlet that supplies water to the grooves located in the internal pot or separator.
- Take the inner container and place it in the outer planter. Don’t forget to insert the water indicator into the hole on the side.
- If you are using the pot outdoors, unscrew the screw at the bottom of the pot. If the pot will be placed indoors, the screw must be tightened.
If you have done everything according to these instructions, then it’s time to move on to planting the plant. Here everything will be very simple, like transplanting a flower into a regular pot but with a slight difference.

How to grow flowers in a self-watering pot?
You probably know that first a plant in such a pot needs to be watered as usual until it gets used to its new home. There are detailed instructions on how to properly use such pots so as not to harm your flower. But today we will tell you how to properly transplant a plant into such an authentic pot:
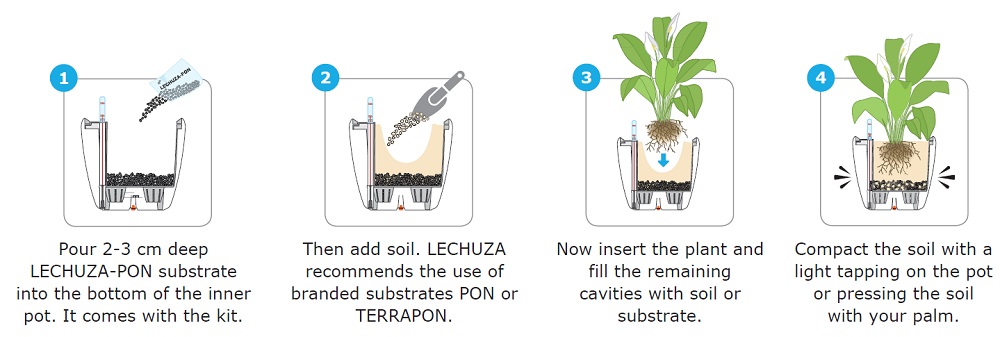
- The set with the pot includes a special substrate LECHUZA-PON. Take this and pour it into the bottom of the pot about 2-3cm deep.
- Now you need to put the soil in the pot. You can take different soil, but it is best to use PON or TERRAPON.
- Take your plant and insert it into the soil. Fill the cavities around the plant with the remaining soil to secure the plant in the planter.
- Tap the pot a little to compact the soil inside. Gently press the soil around the plant with your palm.
After this procedure, you need to water the plant as usual. Place the pot in the chosen location and then learn the rules for watering the plant before starting the automatic watering system.
Features of self-watering planters
If you choose such pots, they can have different designs. There are simple tanks that consist of two planters inside each other, with a water supply tube on the side. But sometimes these tubes have caps to protect the water tube from debris or pests.
Pots of this type must have an overflow mechanism, that is, so that water can drain if the tank is filled to the maximum. This mechanism is needed to prevent the plant from staying in water for a long time, as this can lead to rotting of the root system. An overflow mechanism is needed when you incorrectly calculated the water level and poured too much liquid into the tank.
Conclusion
Self-watering pots are becoming very popular due to their exclusive design and built-in system of supplying liquid to the root system of the plant. You don’t have to worry about your plants dying in your absence. Just a few simple steps and you will prepare planters and plants for comfortable and proper watering. Don’t be afraid to grow any plant in your home or garden, these pots make it easy.


 LECHUZA advantages
 About self-watering system
 Customer reviews